以前からやりたいと思っていたブラウザの実装をやります。
目標
- HTML4.0を一通り実装することを目標にします。
- 「阿部寛のホームページ」を完璧に描画したい。
- jsは一旦なしで。一段落して気が向いたらインタプリタから作ります。
方針
- 言語はgolang、グラフィックライブラリとしてebitengineを使用します。
- ebitengineの抽象度がちょうどいいので。ファミコンエミュレーターのときにもお世話になりました。
- Web Browser Engineering の流れを参考に実装していきます。
- webで無料で公開されています。
- Pythonで実装していますが、流れはかなり参考になります。ステップバイステップで本当にいい本。
- ある程度までいったらHTML4.0の仕様を眺めて埋めていきます。
- テストとかは適宜探します。
リポジトリ:
Day1: httpクライアントを作る
https://browser.engineering/http.html
愚直にURLをパースして、
tcpコネクションにwriteして
    conn, err := net.Dial("tcp", u.Host+":"+strconv.Itoa(u.Port))

  	request := "GET " + u.path + " HTTP/1.1\r\n"
  	request += "Host: " + u.host + "\r\n"
  	request += "\r\n"
  	conn.Write([]byte(request))
readしてパースします。
1行ずつ読んでいって、1行目がstatus, 2行目以降がheaders。空行を挟んで、残りはbody。
	reader := bufio.NewReader(conn)

	// status line
	statusLine, _ := readLine(reader)
	parts := strings.SplitN(statusLine, " ", 3)

	version := parts[0]
	status := parts[1]
	explanation := parts[2]
実行結果はこんな感じ。
Status line:
HTTP/1.1 200 OK

Response headers:
content-length: 1256
connection: keep-alive
content-type: text/html
etag: "84238dfc8092e5d9c0dac8ef93371a07:1736799080.121134"
last-modified: Mon, 13 Jan 2025 20:11:20 GMT
cache-control: max-age=1021
date: Fri, 11 Jul 2025 18:33:38 GMT

Response body:
<!doctype html>
<html>
<head>
    <title>Example Domain</title>
...
実装:https://github.com/pishiko/tenmusu/pull/1/files
Day2: 文字を表示する
https://browser.engineering/graphics.html
雑にhtmlをパースして、雑に表示してみます。
タグ以外を抽出する、雑htmlパーサー。
func lex(body string) string {
	isInTag := false
	text := ""
	for _, char := range body {
		if char == '<' {
			isInTag = true
		} else if char == '>' {
			isInTag = false
		} else if !isInTag {
			text += string(char)
		}
	}
	return text
}
これを雑にレンダリングしていきます。
func (b *Window) Draw(screen *ebiten.Image) {
	y := 0 + b.scrollY // カーソルY+スクロールのオフセット
	x := 0             // カーソルX
	for _, c := range b.text {
        // 一文字ずつ読んで、widthとheightを取得
  		w, h := text.Measure(string(c), b.fontFace, 48)

  		// 右端まで言ったら改行
  		if x+int(w) > screen.Bounds().Dx() {
  			x = 0
  			y += int(h)
  		}
  		// y+h < 0 はスキップ
  		if y+int(h) < 0 {
  			x += int(w) // Move to the next character
  			continue
  		}

  		// y > 画面下に到達時点で描画を終了
  		if y > screen.Bounds().Dy() {
  			break
  		}

  		// カーソル位置に文字を描画
  		op := &text.DrawOptions{}
  		op.GeoM.Translate(float64(x), float64(y))
  		text.Draw(screen, string(c), b.fontFace, op)

  		// カーソルXをずらす
  		x += int(w)
  	}
  }
フォントはmacOSのシステムフォントを利用します
    normal := loadFontFaceSource("/System/Library/Fonts/ヒラギノ角ゴシック W3.ttc", 2)
	bold := loadFontFaceSource("/System/Library/Fonts/ヒラギノ角ゴシック W6.ttc", 2)
実行結果はこんな感じ。ここまでは準備運動と言ったところでしょうか。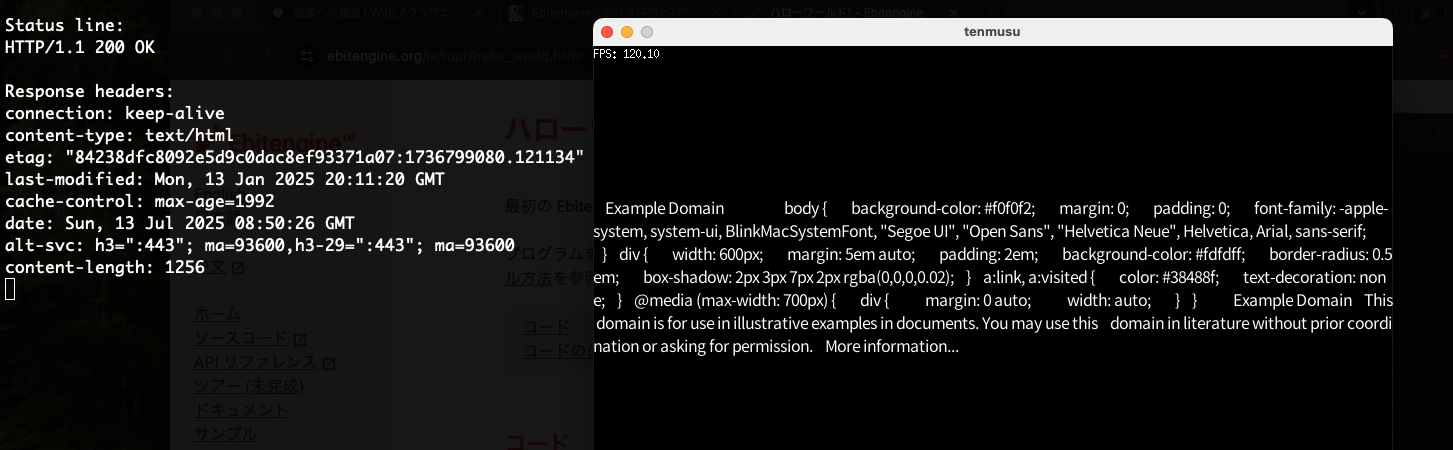
実装:https://github.com/pishiko/tenmusu/pull/2/files
Day3: 文章レイアウト
https://browser.engineering/text.html
htmlパーサーをちょっと実装します。パース後はToken構造体となります。木構造にはまだしません。
type Token struct {
	Type  TokenType //Text, Tag
	Value string
}

func Lex(body string) []Token {
	isInTag := false
	buf := ""
	tokens := []Token{}
	for _, char := range body {
		switch char {
		case '<':
			isInTag = true
			if buf != "" {
				tokens = append(tokens, Token{Type: Text, Value: buf})
				buf = ""
			}
		case '>':
			isInTag = false
			tokens = append(tokens, Token{Type: Tag, Value: buf})
			buf = ""
		default:
			buf += string(char)
		}
	}
	if !isInTag && buf != "" {
		tokens = append(tokens, Token{Type: Text, Value: buf})
	}
	return tokens
}
Tokenを、描画に必要な情報を持つDrawable構造体に変換します。この変換はつまり、文字の表示位置を決めるレイアウトです。
type Drawable struct {
	word   string
	font   *text.GoTextFace
	x, y   float64
	style  string
	weight string
	w, h   float64
}
ここからは本格的にテキストのレイアウトと格闘することになります。単語単位での改行や、異なるサイズでのレイアウトを実装していきます。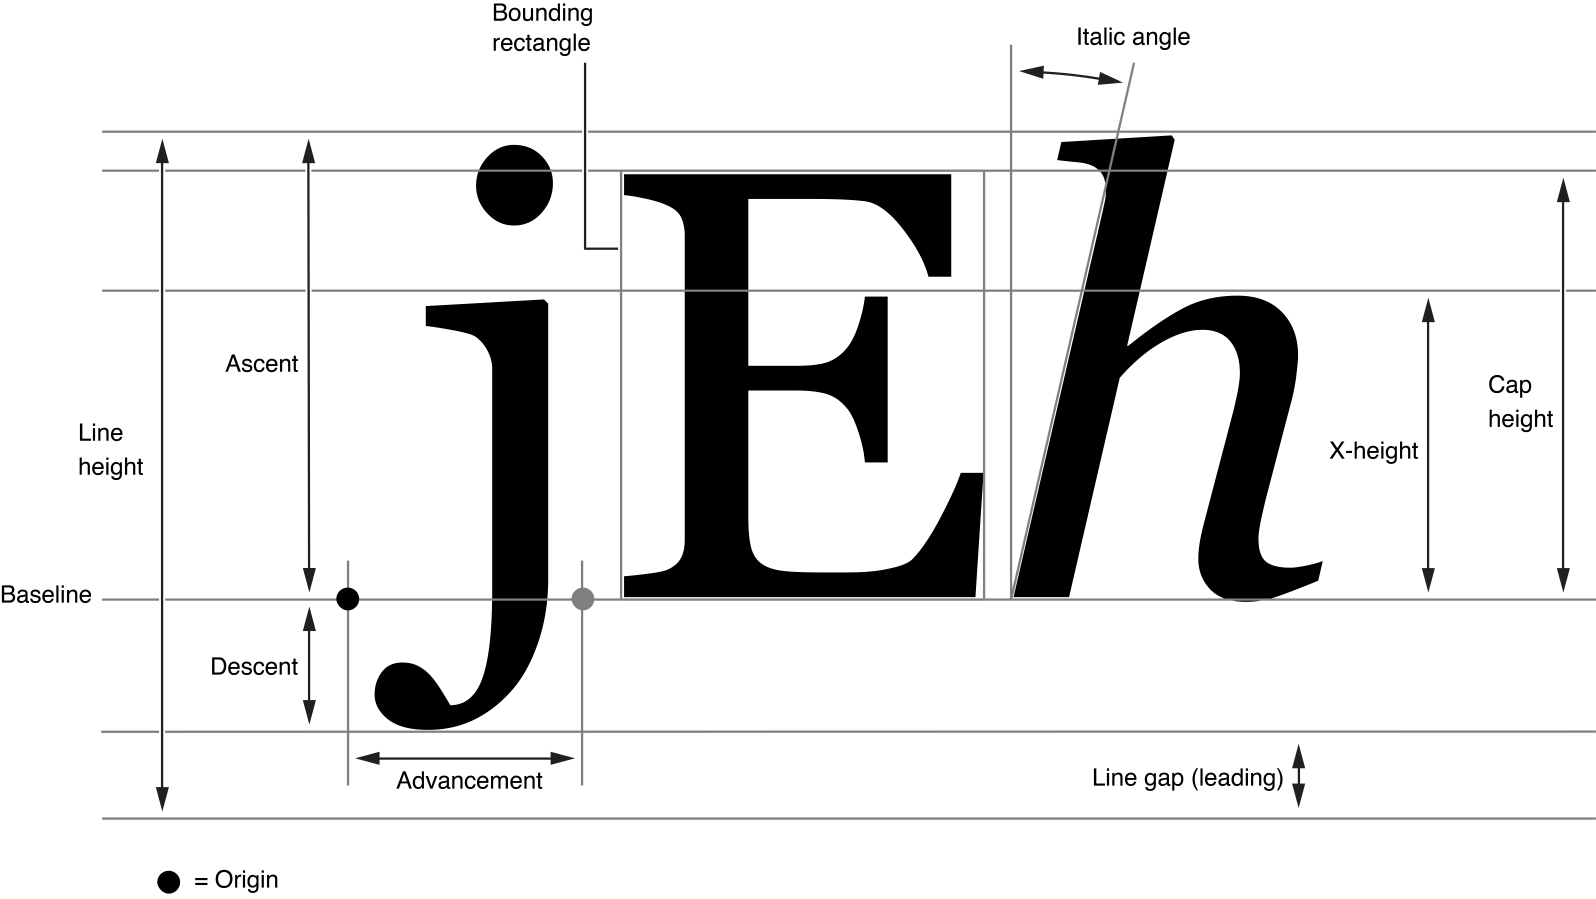
ref: https://developer.apple.com/library/archive/documentation/TextFonts/Conceptual/CocoaTextArchitecture/Art/glyphmetrics2x.png
フォントファイルには文字のベクターデータの他に、上記のようなレイアウトに関する情報が含まれています。フォント情報はebitengineのインタフェースから取れますが、レイアウトは自前で実装します。
レイアウトを行っていきます。各Tokenのテキスト、つまりひとまとまりのプレーンテキストに対して、1単語ずつ見ていきます。
LineにWordを貯めて、次のWordが見切れるようであればFlushします。Flushでは1Line分のy軸のレイアウトを確定させます。
func (l *Layout) Drawables() []Drawable {
	for _, token := range l.tokens {
		switch token.Type {
		case html.Text:
			for _, word := range strings.Split(token.Value, " ") {
				f := &text.GoTextFace{
					Source:    source,
					Direction: text.DirectionLeftToRight,
					Size:      l.size,
					Language:  language.Japanese,
				}
				// width, heightを計算
				w, h := text.Measure(word, f, f.Metrics().HLineGap)

				// 右端まで言ったら改行
				if l.xCursor+w > float64(l.screenRect.Dx()) {
					l.flush()
				}

				// Lineに追加
				l.line = append(l.line, Drawable{
					word:   word,
					font:   f,
					x:      l.xCursor,
					y:      l.yCursor,
					style:  l.style,
					weight: l.weight,
					w:      w,
					h:      h,
				})

				// 次の単語のX座標を更新
				l.xCursor += w
				spaceWidth, _ := text.Measure(" ", f, f.Metrics().HLineGap)
				l.xCursor += spaceWidth
			}
		}
	}
	return l._drawables
}
Flushでは、フォント情報を基に単語のy座標を確定させます。Baselineに対して、胴がAcsent、脚がDescentです。胴の最大がBaselineになり、胴の最大+脚の最大が行の高さになるわけです。行間も計算します。
func (l *Layout) flush() {
	maxAscent := 0.0
	maxDescent := 0.0
	maxGap := 0.0
	for _, d := range l.line {
		metrics := d.font.Metrics()

		if metrics.HAscent > maxAscent {
			maxAscent = metrics.HAscent
		}
		if metrics.HDescent > maxDescent {
			maxDescent = metrics.HDescent
		}
		if metrics.HLineGap > maxGap {
			maxGap = metrics.HLineGap
		}
	}
	for _, d := range l.line {
		baseline := l.yCursor + maxAscent
		y := baseline - d.font.Metrics().HAscent
		l._drawables = append(l._drawables,
			Drawable{
				word:   d.word,
				font:   d.font,
				x:      d.x,
				y:      y,
				style:  d.style,
				weight: d.weight,
				w:      d.w,
				h:      d.h,
			},
		)
	}
	l.yCursor += (maxAscent + maxDescent) + maxGap
	l.line = []Drawable{}
	l.xCursor = 0
}
レイアウトは出来たので、サイズ変更のタグを反映していきます。と言っても簡単です。<big>だったら文字サイズを+4、</big>だったら-4すればいいわけです。boldはフォントのweightを変えます。
italicは...実は奥が深いです。イタリック体というのは本来英語の筆記体なのですが、日本語にはそのようなものはないです。なので日本語は斜体(oblique)になります。なので、単にSkewします。
これらは、バリアブルフォントと呼ばれる規格のフォントを使用すると楽なのですが、残念ながら日本語で傾きを制御できる無料のバリアブルフォントは無いようです。(文字数が英語とは桁違いなので...)
func (l *Layout) Drawables() []Drawable {
	for _, token := range l.tokens {
		switch token.Type {
		case html.Tag:
			switch token.Value {
			case "i":
				l.style = "italic"
			case "/i":
				l.style = "roman"
			case "em":
				l.style = "italic"
			case "/em":
				l.style = "roman"
			case "b":
				l.weight = "bold"
			case "/b":
				l.weight = "normal"
			case "strong":
				l.weight = "bold"
			case "/strong":
				l.weight = "normal"
			case "big":
				l.size += 4.0
			case "/big":
				l.size -= 4.0
			case "small":
				l.size -= 2.0
			case "/small":
				l.size += 2.0
			case "br":
				l.flush()
			case "/p":
				l.flush()
				l.yCursor += 16.0 // Add some space for paragraph
			}
		case html.Text:
			for _, word := range
...
実行結果。左がChrome、右が実装。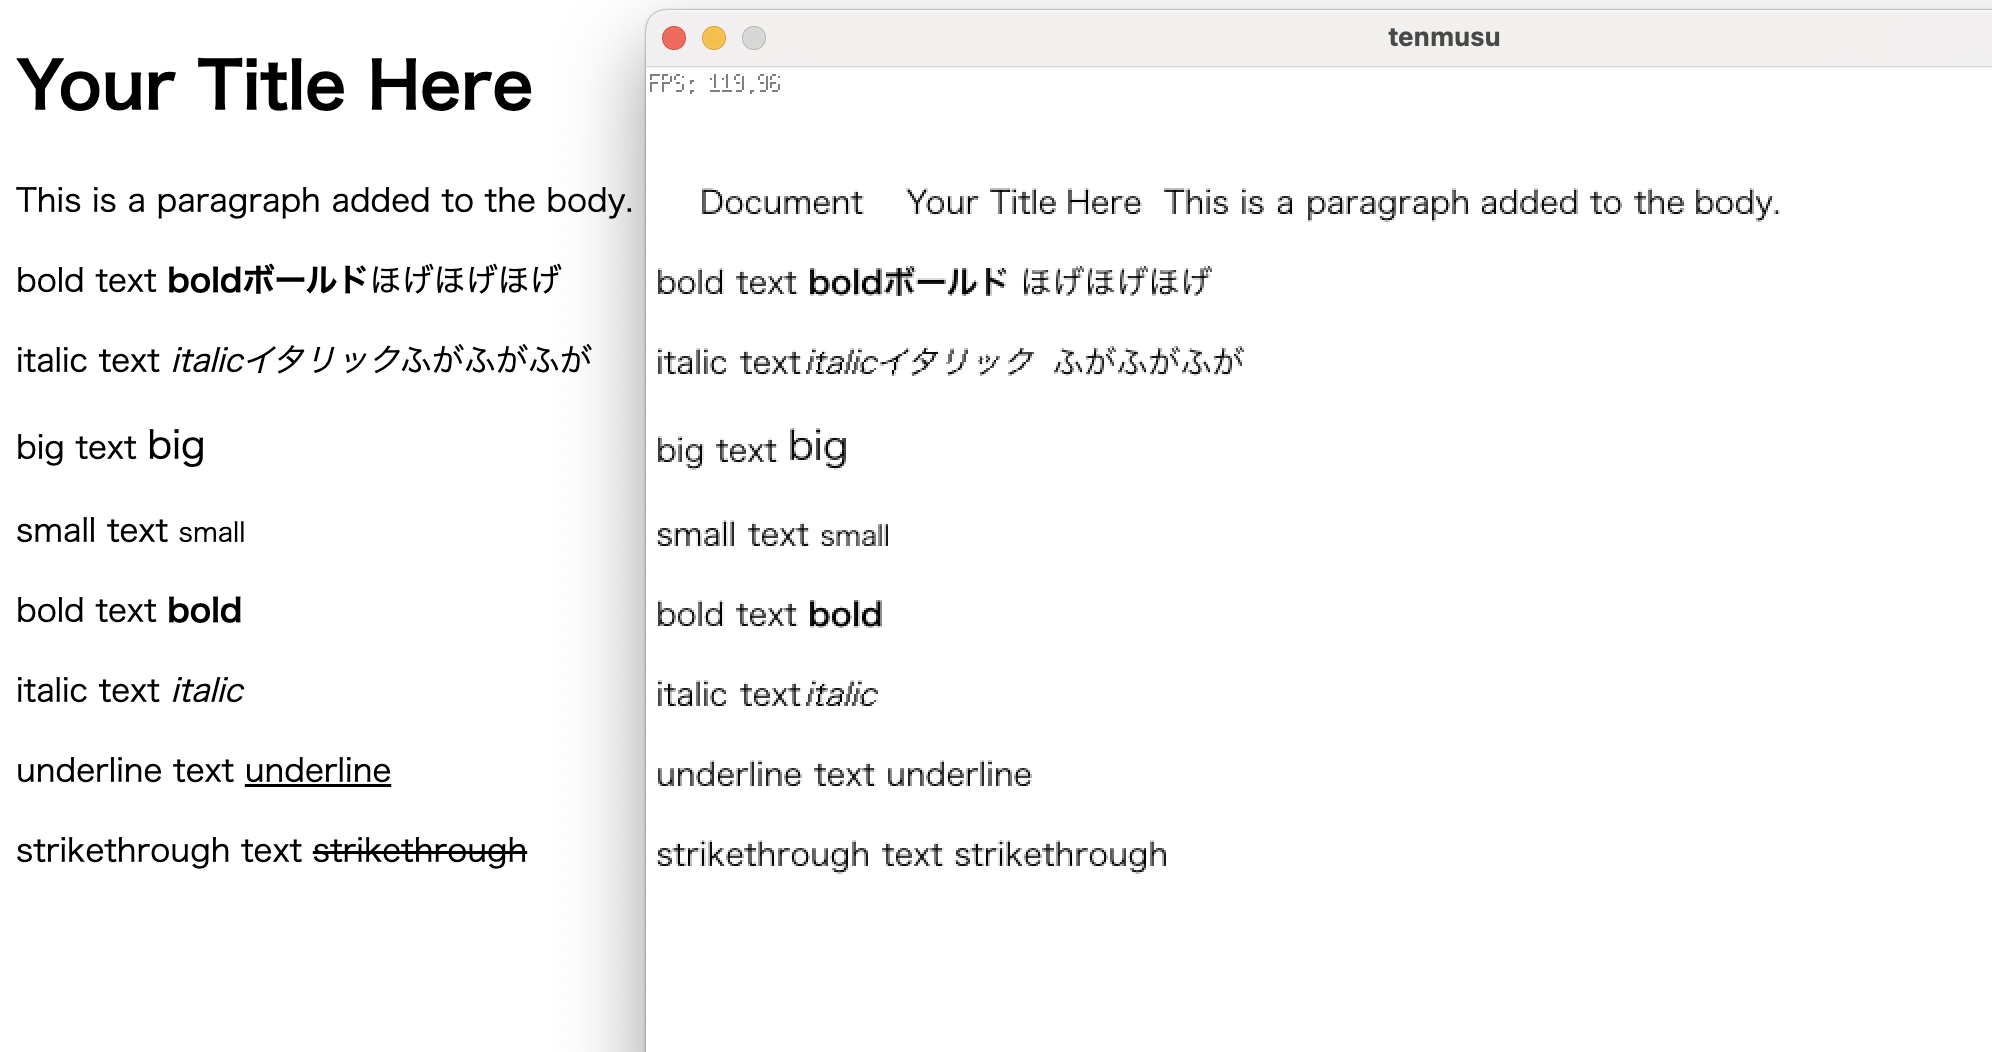
ようやくまともにプレーンテキストが表示できるようになりました。
実装:https://github.com/pishiko/tenmusu/pull/3/files
続く...
次回はいよいよ木構造でパースしていきます。